Step 1: Gather Necessary Equipment
Acquire the necessary tools and equipment before starting the refrigerant charge check. These usually consist of a thermometer, safety gloves, safety goggles, a charging hose, and a refrigerant pressure gauge. To get accurate results, be sure that all of the equipment is in good operating order and has been calibrated correctly.
Step 2: Check Operating Conditions
Make sure the chiller system is running under normal conditions before evaluating the refrigerant charge. Check that the chiller is operating at its typical capacity and that all of its parts—the compressor, condenser, and evaporator, for example—are performing as intended. Take note of the humidity and ambient temperature as well, since these can affect the evaluation of the refrigerant charge.
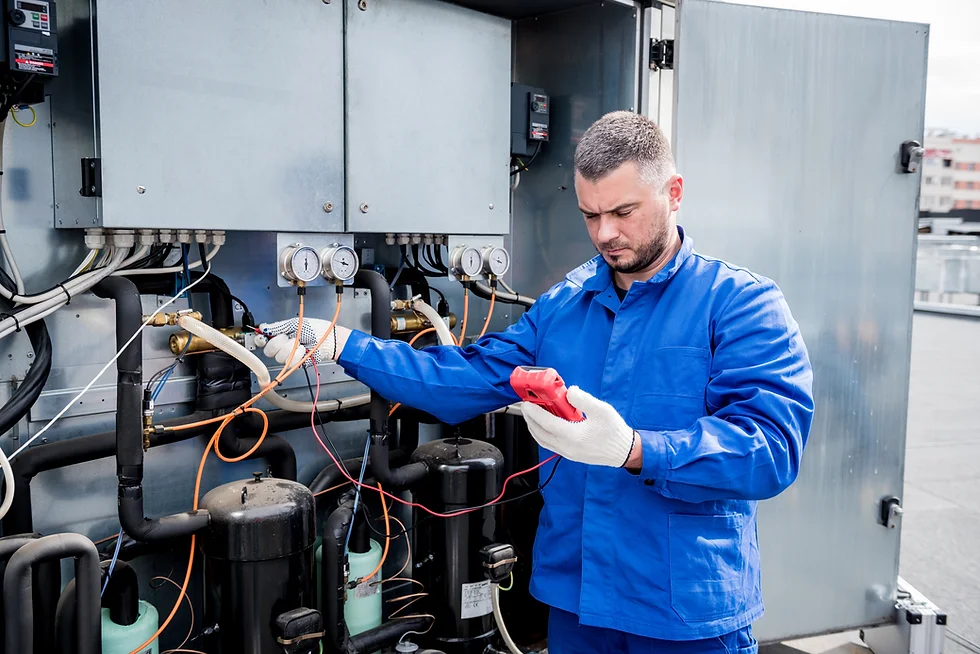
Step 3: Check the Temperature and Pressure of the Refrigerant
Determine the temperature and pressure of the refrigerant at different points inside the chiller system by using the thermometer and pressure gauge. First, connect the pressure gauge to the chiller’s suction and discharge lines. Take note of both lines’ pressure measurements and compare them to the manufacturer’s recommendations for the given operating circumstances.
Next, use the thermometer to take the refrigerant’s temperature at the same locations. Ensure that the temperature readings match the expected values according to the refrigerant’s pressure-temperature relationship. Significant departures from the predicted values could be a symptom of an incorrect refrigerant charge.
Step 4: Determine Superheat and Subcooling
In a chiller system, subcooling and superheating are important markers of the state of the refrigerant charge. The temperature differential between the actual and saturation temperatures of the liquid refrigerant at the condenser outlet is referred to as subcooling. Conversely, superheat is the temperature differential between the saturation temperature of the refrigerant and its actual temperature at the evaporator outlet.
Subtract the saturation temperature of the refrigerant at that pressure from the temperature of the liquid refrigerant exiting the condenser to determine subcooling. Similarly, you can subtract the saturation temperature at that pressure from the temperature of the refrigerant vapor exiting the evaporator to find superheat. To evaluate the refrigerant charge state, compare the computed subcooling and superheat values to the manufacturer’s suggested ranges.
Step 5: Adjust Refrigerant Charge if Necessary
Assess if the refrigerant charge of the chiller needs to be adjusted based on the measurements and computations made in the preceding steps. Under- or overcharging may be indicated if the refrigerant pressure and temperature readings, as well as the subcooling and superheat values, are not within the permitted range.
Take the necessary steps to bring the refrigerant charge back to the recommended amount if it is discovered to be inaccurate. This could entail utilizing the charging hose to add or remove refrigerant from the system according to the correct protocols specified by the equipment maker. Verify that the refrigerant pressure, temperature, subcooling, and superheat are all within the intended range after making any necessary modifications.
Step 6: Conduct Leak Detection Test
Over time, leaks can occur in chiller systems, even with the correct refrigerant charge. This can result in refrigerant loss and possible performance problems. To find any leaks in the system, a leak detection test must be carried out once the refrigerant charge has been evaluated. To check for leaks, use a soap and water solution or a refrigerant leak detector to examine connections, fittings, valves, and other parts. To stop more refrigerant loss and guarantee the chiller system’s continuous integrity, quickly address any leaks that are found.
Step 7: Document Findings and Maintenance Actions
For the chiller system to be managed effectively, thorough documentation of the refrigerant charge assessment and any repair performed must be kept. Maintain a thorough maintenance document or software system that records all measurements, computations, modifications, and leak detection outcomes. Add the assessment date, the surrounding circumstances, the equipment readings, and any notes or suggestions for further maintenance. This documentation is a useful tool for monitoring system performance over time, seeing patterns or reoccurring problems, and helping with preventive maintenance scheduling. It also guarantees that regulatory standards are met and offers a historical record for troubleshooting.
How Do I Know If My AC Needs To Be Recharged?
Several important indicators might help you determine whether your air conditioning (AC) system needs to be recharged. The air that enters your home is cooled by the refrigerant in your air conditioning system. Leaks and general wear and tear can cause the refrigerant level to drop over time. Here are a few indicators that it’s time to recharge your air conditioner:
Firstly, a low refrigerant level may be the cause if your air conditioner is blowing warm air rather than chilly. The air cannot be adequately chilled if there is insufficient refrigerant because it is what removes heat from the air. Second, be mindful of the airflow coming from your vents. An issue with the refrigerant level may be indicated if you observe poor airflow or none at all. Airflow may be restricted if the coils freeze due to low refrigerant.
Thirdly, pay attention to your energy costs. Low refrigerant levels may be causing the system to struggle to chill your home, which could explain why your AC is running nonstop while your energy bills are greater than normal. Also, keep an ear out for any strange sounds emanating from your air conditioner. Sounds like hissing or bubbling could be signs of a refrigerant leak that needs to be recharged.
Lastly, ice formation on the exterior unit or refrigerant lines is an obvious indication that there is a problem with your air conditioning system and that it may need to be recharged. You must have your AC system inspected by a trained HVAC professional if you notice any of these symptoms. To make sure your AC is operating effectively, they may assess whether a recharge is required and take care of any underlying problems. Maintaining your home’s comfort and extending the life of your air conditioning system can be accomplished with routine maintenance and quick resolution of issues.